Part two: Basic Stamping Technique
Part three: Advanced Techniques
Part four: Reverse Stamping/Decals
Hello Readers!
Today I decided to do something a little bit different, and a little bit more informative than my usual post. I know a lot of the time I reference stamping techniques and polishes but I don't usually take the time to go into detail about how to do it, so I thought it would be nice to do a detailed tutorial on how I personally do my stamping.
I'm going to break up this guide into a few different pages, because I realize that I have a lot to say about the subject. This first series is going to focus on my favorite stamping products, since that's the first thing you really need when learning how to stamp.
So, to do that, I suppose I should start at the beginning... which is prepping the canvas.
Base coats

I always start my manicures with a base coat. My favorite base coats are the PRO-FX Sticky Base Coat and Essie's "Millionails", pictured above. I normally use the Essie, because my nails are super weak and this is the best basecoat that I have found to keep them growing stronger. The PRO-FX is mainly used on friends who come over for manis who don't have a problem with weak nails.
Using a base coat helps your mani last longer and protects your natural nail, so it's super important! Sometimes I use UNT peel-off base coat if I am going to be using a glitter polish, or otherwise stubborn to remove polish on my nails because nobody likes removing glitter with acetone. However, I have noticed that the peel-offs aren't as effective in preventing nail stains, so it's something to consider if you care about that.
You may need to try a few different base coats before you find the perfect one to work with your particular nails, and your particular body chemistry.
Topcoats
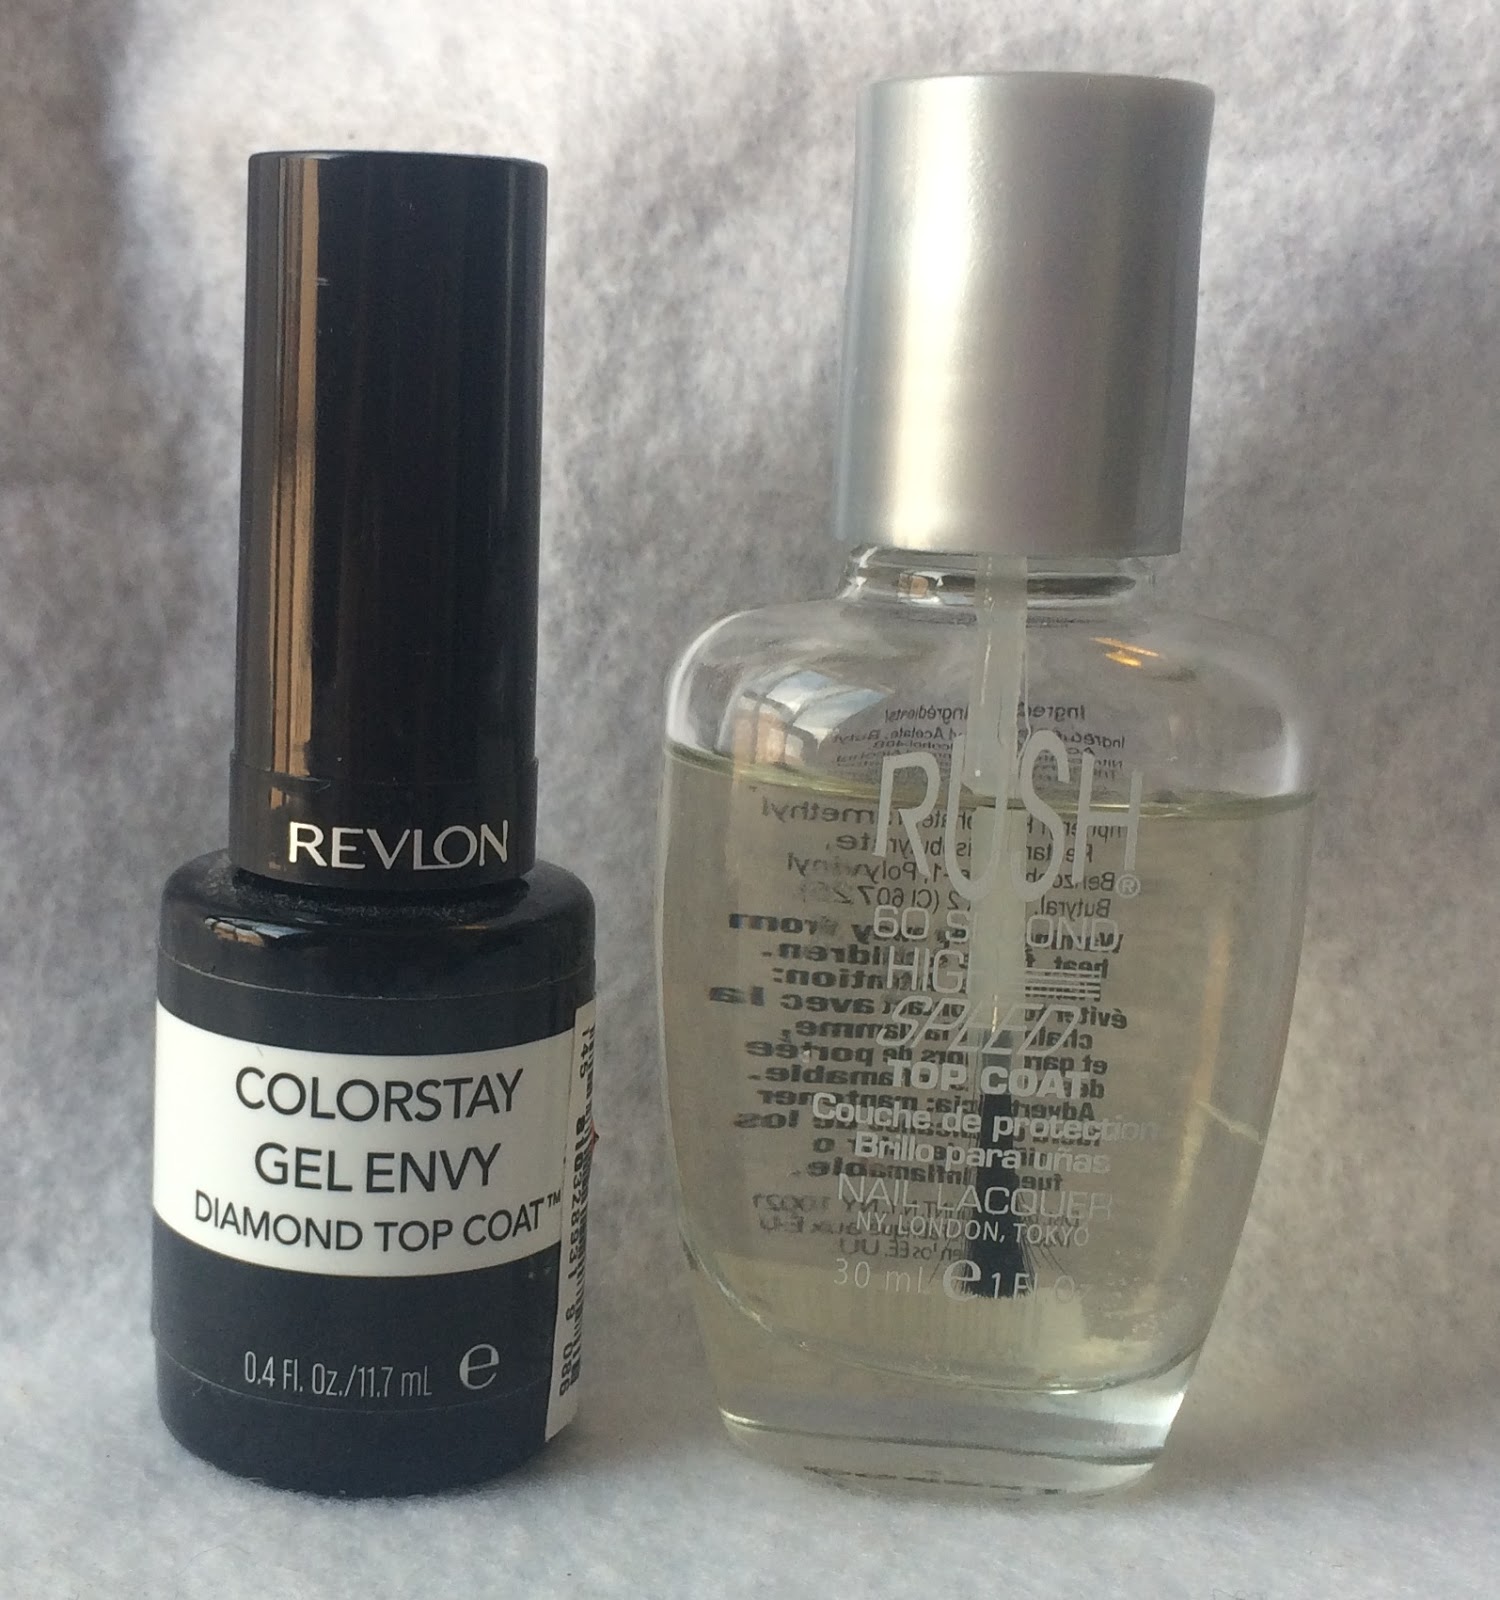
I have just two topcoats that I use regularly.
The first is the Revlon brand "Gel Envy" topcoat. The only reason I used this one in particular is because I found a boatload of them at Tuesday Morning for $1 each, and I imagine most "gel-like" topcoats would work just as well. I use this to make stamping decals, or as a topcoat if I'm using a black stamping polish (because it does a good job of not smudging the finicky black stamping polishes), or if I want to wear a mani for more than a few days because it does last longer than a regular topcoat.
The second is the quick-drying topcoat "Rush" that they sell at Sally Hansen. This is the topcoat I use for most manis. It dries quickly, it feels super smooth on your nails, and I just really like it. It is also pretty inexpensive so that's a bonus too. :)
Cuticle Oil
It's so important to properly moisturize your nails! I always apply nail oil to my nails after removing my polish, and I let it soak in while I'm prepping any decals and otherwise getting ready for my next mani.
At first I was using an ORLY cuticle oil, but when that started to run out I began looking at my options for the best cuticle oil that was a reasonable price... and I decided the best solution was for me to DIY it. Cuticle oil is expensive for what you get, and I go through a lot of it. So I googled tutorials for DIY cuticle oil and ended up buying Jojoba oil, Vitamin E oil, and mixing that with a little bit of fractionated coconut oil (because I'm into DoTerra and I had it lying around) and a few drops of essential oil (Doterra "Citrus Bliss"). The initial investment was more than the price of a bottle of oil, but the quality is way, way better than all but the most expensive oils and in the long run it's a lot cheaper. I'm really happy with it- it works so well for my delicate nails.
Stampers
So, now that we have that out of the way, let's talk about stamper heads. There are a few different types of stamper heads, but the only kind I personally ever use are clear stamper heads, like this one from Bundle Monster:

 |
| The three stampers I use all the time, all of which are no-name stampers bought for around $2 each from Ebay or Aliexpress. Just search for "Clear Jelly Stampers." Shipping takes some time, so if you want your stamper faster you can always order from Bundle Monster or Amazon. |
Scrapers
As for scrapers go, I simply use old credit cards. Instead of tossing them, into the nail art caddy they go and I use them until they break apart. I don't like the little metal ones or funky shaped plastic ones that sometimes come in stamper sets, though the card-style ones that stamping companies sometimes sell are fine.Stamping Polish
So the next question is, "Do I really need dedicated stamping polish, or will regular polish work?"
My answer: No, you absolutely do not *need* stamping polish, although it can sometimes be nice to have.
Most of the time, I just use normal nail polish to do my stamping, although I do have quite a few bottles of polish that is specifically marketed for stamping. If you are a beginner, I would recommend starting with some basic colors of regular polish before investing in stamping polish, for a few reasons...
1. You can't really paint your nails with stamping polish. The brushes are thicker than normal brushes and the polish is more pigmented and has a different, thicker formula than regular polishes.
2. Black stamping polish in particular is notoriously fussy. It's typically so highly pigmented that clean-up is a real pain in the butt, and the polish is very prone to smudging when you apply topcoat.
3. You probably can't find stamping polish in your drugstore, and it's more expensive to buy polish online, plus it takes time for it to arrive. Your money, I feel, would be better spent on other things, at least in the beginning.
So then, what polishes do work well for stamping?
Any polish that is very pigmented, polishes that you would call a "one-coater", or most "two-coater" polishes. This simply means polishes that cover your nail in just one or two coats.
I personally use a lot of the Sinful Colors brand, because it is cheap (~$2 a bottle) and easy to find, and it tends to have very good formulas.
Black and White polishes
In fact, the two polishes that I go through the most and use on almost every mani are Sinful Colors "Black on Black" and "Snow Me White." However, occasionally I will run across a bottle of Sinful Colors "Black on Black" that doesn't stamp well when I first open it. This has only happened to me once, but I have heard of it happening to others as well. If this happens, all you need to do is to let it evaporate down a little bit into a thicker formula. To do this, unscrew the top and leave the brush inside the bottle, but leaning to the side so that the bottle is open to the air. (You could take the brush out, but then the polish might dry on it and leave it crusty.) After about 10 minutes, test the polish again and see if it will stamp. If it's still too thin, leave the bottle open longer.
I've never had this problem with the Sinful Colors white; only the black one.
As far as actual stamping polishes go, I can't say I'm an expert because I've only really tried two- the Born Pretty Store one and the Bundle Monster one. The Born Pretty Store black is super finicky to work with, but I find it is better at picking up super fine details than the Sinful Colors black so if I have a super detailed image I will use it, but I prefer the Bundle Monster black over it; it's just a little easier to work with.
These dedicated stamping blacks *are* deeper and more opaque than the Sinful Colors black. Most of the time it isn't a big deal to me, but if I'm stamping over a dark color it can be helpful to use a more pigmented black.
As far as whites go, I haven't had the same difficulty with stamping whites that I do with black stamping polishes; the Bundle Monster white stamping polish that I have isn't particularity difficult to work with and does have a better opacity than the Sinful Colors one. But I'm overall pretty pleased with the performance of the Sinful Colors polish and since it's cheaper, I save the Bundle Monster for if I'm stamping an image that has lots of solid space because in those instances a better opacity is important.
I've never had this problem with the Sinful Colors white; only the black one.
 |
| Sinful Colors "Snow Me White" in action Link to more details |
As far as actual stamping polishes go, I can't say I'm an expert because I've only really tried two- the Born Pretty Store one and the Bundle Monster one. The Born Pretty Store black is super finicky to work with, but I find it is better at picking up super fine details than the Sinful Colors black so if I have a super detailed image I will use it, but I prefer the Bundle Monster black over it; it's just a little easier to work with.
 |
| This mani has images with a lot of "solid space", so I opted for a Black stamping polish. Link to more details |
These dedicated stamping blacks *are* deeper and more opaque than the Sinful Colors black. Most of the time it isn't a big deal to me, but if I'm stamping over a dark color it can be helpful to use a more pigmented black.
As far as whites go, I haven't had the same difficulty with stamping whites that I do with black stamping polishes; the Bundle Monster white stamping polish that I have isn't particularity difficult to work with and does have a better opacity than the Sinful Colors one. But I'm overall pretty pleased with the performance of the Sinful Colors polish and since it's cheaper, I save the Bundle Monster for if I'm stamping an image that has lots of solid space because in those instances a better opacity is important.
Dark-Toned Polishes
One type of color I would say you can almost always get away with using regular polish for is dark-tones. That'll be your Navy Blues, your Plums, etc. The one exception to this rule is dark reds; I find that they always come out too pink when I try to stamp with burgundy polish. Because of this, I do own a burgundy stamping polish, but it's really the only dark-toned stamping color I have. |
| The blue stamping here is done with Sinful Colors "Navy I Do", but the red is a Bundle Monster Stamping polish. More info here. |
Now, you can expect that any polish you stamp with- stamping polishes included- is going to stamp a few shades lighter than it looks in the bottle. If you aren't sure how it will look over the color you want to stamp it over, I recommend testing it out on your silicone mat first- if you don't have a silicone mat you can use a plastic baggie or a piece of clear tape over paper. I do test polish on paper sometimes, but since paper is porous it takes a few extra coats to get the base coat opaque, but it doesn't matter that much if you're just testing it.
One of my all-time favorite regular polishes to stamp with, however, is Sinful Colors "Navy I Do". It stamps soooo beautifully!
Pastel/Neon Polishes

If you're going to invest in some stamping polishes, pastels and neons would probably be my recommendation, especially if you want to stamp over dark colors. You can use regular pastel polishes sometimes too, but most of the time the stamping pastels will preform a lot better. I have a couple of Bundle Monster neon and pastel sets, and in the photo above you can see that I've stamped with a pastel green over black. That level of opacity would be pretty hard to achieve with a normal polish.
That being said, you can usually count on pastels and lighter colored polishes to stamp well over white.
 |
| Lovebirds blog post |
For example, here is some stamping done with a Sinful Colors polish, "Let's Playa". (The white stamping in this particular example is a Bundle Monster stamping polish, "Bami White")
I like using regular polishes over white because it's a lot easier than trying to find the perfect stamping polish to match the polish that you are putting on your other fingers. This mani only uses 4 polishes- the Sinful Colors "Snow Me White" for the base, the peachy "Let's Playa", the Bundle Monster "Bami White" stamping polish, and Sinful Colors "Black on Black".
Bold Colors
There is normally no problem at all with using regular bold polishes to stamp, especially over lighter colors.

I mean, I really have tried a lot of different drugstore metallics, but I never end up being pleased with their performance. However, you can usually count on drugstore metallics to stamp decently well over very dark colors, or to work well over medium to light polishes if you want a more subtle effect.

All the stamping on the above mani is just done with regular polish. One of my favorite bold polishes to stamp with is Sinful Colors "Endless Blue", which is what is on my ring finger above.
Foil Polishes
Ok, so now we are getting to one of my favorite regular polishes to stamp with: Sinful Colors foils. A foil polish has tiny, tiny shimmers running through it. Now, you can't normally stamp with glitter polish because of the particles, but all of the Sinful Colors foils that I have found stamp beautifully. Unfortunately, they can be tricky to find because they are often released as part of a holiday collection. But if you ever run into these during those promotions, I highly recommend them.
 |
| This example of a foil polish at work shows two pinks that are similar in tone for a more subtle mani- but I'm amazed at the detail this foil polish picked up! Follow this link for more details |
Metallic Polishes
Now, this is one area that I know I'm going a little bit against the grain when I recommend using "real" stamping polish. When I was researching to learn everything I could about stamping, a lot of people recommended using regular polish for metallic stamping. However, I find that when I want a gold or silver polish to stamp with, my Bundle Monster stamping polishes far outshine any drugstore metallics that I own.
 |
| Bundle Monster's "Freedom Ring" for silver stamping |
Stamping Plates
Ok, so now that I've given you the low-down on polish, it's time to get to the big one: Stamping plates. There are so many different brands out there, but since this post is about my favorite products I'm just going to tell you about a few of my favorites.
One thing about stamping plates- when you first buy them, almost all stamping plates will come to you with a protective blue film over the top of them. This film must be removed prior to stamping.
One thing about stamping plates- when you first buy them, almost all stamping plates will come to you with a protective blue film over the top of them. This film must be removed prior to stamping.
Bundle Monster
By this point, you've heard me mention the Bundle Monster company quite a bit. No, I'm not sponsored by them, I just really like their products. Part of the reason for this is because they are based in the USA (Hawaii), it is easier for me to order nail polish from them than from overseas company (even though Hawaii is technically "overseas" to me) because it doesn't have to go through customs.
This doesn't matter so much with stamping plates, but I think that the Bundle Monster plates are reasonably prices, have images that appeal to me, and you can get free shipping on orders over $25 USD. I also have been consistently happy with the quality of the etch on the plates.
For nail stamping newbies, the etch of the plate is how deeply the images are carved into the metal. If the plate isn't etched deeply enough, you won't be able to use it. Sometimes plates also have errors in the etch that make some areas of the plate unusable.
 |
| An older Bundle Monster plate from the "Secret Garden" collection, in the round style. These cost about $1.99 individually, but much less if you buy the whole collection. |
 |
| A newer style Bundle Monster plate from the "House of Horrors" collection. These go for around $2.99 individually, or around $1 each if you buy the whole collection. |
 |
| These rectangular plates are about twice as big as the square plates. They cost around $4.99 individually. This particular plate comes from the new "Kawaii Emoji" collection. |
MoYou London
MoYou London is a company based in London, and it creates amazing stamping plates. The quality of these plates is top notch, and the variety of images is mind-blowing. They come out with new plates almost every Friday, and you can really get in trouble- or your wallet can, anyway- with this company. ;)
The plates are a little on the expensive side at 5.99 pounds each, but they do go on sale for 20% off every so often. It's a splurge that in my opinion is well worth it. To see what I've done with these plates, check out this page.
 |
| A Moyou London Plate from the Scandi line with beautiful details |
 |
| My favorite MoYou London plate, because of its versatility |
Born Pretty Store
Born Pretty is a company based in China, and they sell a variety of plates including their own house brand. These plates are on the more affordable side of things, and I have never had a problem with the etching of the images. They cost about $3 in their online store with free shipping and no minimum purchase, but you can also find them for even cheaper on Ebay if you just do a search for "Born Pretty Stamping Plates." For nail art inspiration using these plates, check this page out.
Cheapo Ebay/Aliexpress Plates
You may have noticed by now that I'm not exactly a brand purist; I'm more of a bargain hunter. I have been known to purchase plates for a dollar or less on websites like Ebay and Aliexpress, and I regret nothing. A lot of times dupes of expensive brands like MoYou London or UberChic will pop up on those websites, and usually these dupes preform acceptably. The etch isn't quite as good as the name brand typically, but they work. If there's a dupe of a plate that I think I will probably only use once or twice anyway, I'll go ahead and pick it up. I do try to stay clear of images that have a lot of solid space on these cheaper plates though, as a deep etch is pretty important for those types of images.
To see some examples of such plates and nail art created with them, check out this page.
 |
| This plate is a near-exact copy of a MoYou London plate, made by a Chinese company and found on Aliexpress for about a dollar. |
Miscellaneous Necessities
Cotton Claw/Self-closing tweezers

Yes, you really need this. When you are stamping on your nails and you need to wipe off your stamping plate you don't want to risk ruining your polish by handling an acetone-soaked cotton ball. They sell basic cotton claws on Aliexpress for a couple bucks, but I actually use a pair of self-closing tweezers that I happened to have lying around my house already, and they get the job done just fine.
Lint Roller
This is for cleaning off your stamper. If you use acetone to clean the excess polish off your stamper head, it will eventually damage the soft material. Instead, simply dab the polish off onto a lint roller. Easy peasy.
Silicone Mat
Not technically a necessity, you can get by without it, but still very useful. I bought my silicone mat from Michael's and I used 50% off coupon and only paid a couple of bucks for it. Nowadays there are silicone mats all over Aliexpress for a few dollars, or you could pay $20 for a fancy one made by a stamping company, but I don't really see the point. The one I found at Michael's is excellent and I would highly recommend it- it is made by "Mod Podge" and I think I found it in the glue gun area. Random, yes, but the mat is nice and thick and it is mostly blank which comes in handy if you want a clear surface to make stamping decals on.
I regularly use my mat to make stamping decals, mainly because I don't own 10 stamping heads and if you are doing multiple decals you don't want to have to wait for one to dry completely before you move on to the next one, but also because I find it more comfortable to bend over my silicone mat than to bend over a stamping head.
I also use my mat as a barrier between the polish I am working with and my kitchen table.
Clean-up Brushes
 |
| My well-loved clean-up brushes. You can see that the orange bristled brush has begun to fray. |
Ok, real talk. I've never really messed around too much with trying out the "best" cleaning brushes. I bought a large set of nail art brushes off of Amazon when I first started stamping and the 4-ish out of those that were actually the right shape (nice and thin!) to work as a clean-up brush lasted nearly a year until they were too frayed to work properly.
For those inexperienced in nail art, a clean-up brush is a super important tool because you use it to clean up all the nail polish that you got all over your fingers when you stamped them, and also to clean up any errant polish you got on your cuticles when you painted your nails.
Acetone breaks down the fibers in the brushes over time, even expensive fibers, so it's not necessary to spend a whole lot of money on these. Synthetic fibers tend to hold up better and last longer than natural ones.
I recently bought this nail brush set from Born Pretty to replace my dying ones, and I've been happy with it so far.
I haven't tried it myself, but I have also heard that the $1 ELF eyeliner brushes from Target work great as a clean-up brush.
Acetone
You need 100% Acetone to clean up your stamping plate in between uses. You don't want to use regular nail polish remover for this as it can leave behind a residue and make future attempts not turn out so well.Well, that pretty much sums it up.... in one very lengthy post! If you have any questions for me, pop them down in the comments and I will be sure to answer them the best I can. And if you disagree with me... you can let me know about that, too. ;) These are simply my opinions from the experience that I have had with stamping and I know that not everyone will agree.
It's a useful post. I use sticky stampers the most often and prefer metal scrapers. It's true you don't need stamping polish, if you have well opaque standard ones.
ReplyDeleteThat's awesome! I have a marshmallow stamper, but I always have trouble getting the image onto my nails without warping it! They are so great at fine details, though.
Delete